Breaking Mirrors: On Set With The Profoto Pro-10
I was given a chance by Samy's Camera here in San Francisco to test out the new Profoto Pro-10 power pack (say that ten times fast). It is an excellent power pack with lots of cool features.
For this test, I was most interested in the flash duration. The test subject needed to be fun yet also demonstrate how well the Pro-10 can stop motion. Breaking glass ranks pretty high on the fun scale and is an excellent way to test freezing action.
Rather than clear glass, I dropped a mirror because it can reflect color, adding some unpredictability and creativity to the photo. A tent was built of seamless colored paper for the mirror to reflect. The dropped mirror was captured right after it had bounced off the ground and shattered still keeping its shape. When the mirror broke, each piece of glass reflected a different color from the paper tent, creating a mix of color shapes.
There was, of course, some testing to achieve the right timing and delay setting of the trigger before breaking the first mirror. To capture the mirror in focus (and to add to the superstitious nature of the shoot) I photographed at f13. The fastest flash durations of the Pro-10 are at the lower power settings. I used a flash duration of 1/45,000 (2.2) for the main head and 1/26,000 (4.2) for the head that was lighting the color paper. Both measurements are using the t.5 method and illustrated in this chart from Profoto:
Each mirror drop was captured by 3 different cameras, each at various angles. In the end, I only ended up using two of the camera angles.
If you've used any of the newer Profoto strobes, B1, B2, or D2, you'll be instantly familiar with the menus and interface of the Pro-10. The pack itself is very refined. If you need to photograph a splash of liquid or explosion of some kind, you'll need a fast flash duration. The Pro-10 definitely provides that.
I'm very pleased with how the images turned out. They are quite beautiful, well worth earning years of bad luck for smashing mirrors!
Here's a behind the scenes video: https://www.periscope.tv/peter_belanger/1lDGLRVjyaRxm?t=3s
Canon and Sony
Another quick test: this time it’s about the Sony a7rII and Canon 5DSR. I added the Canon 5D MKIII just for reference. There is no grading added to the photos. My first impression is that the a7rII holds up very well against the 5DSR. This is my first Sony camera so I wasn’t sure what to expect. The 42MP image is close enough to the 5DSR that image quality does not seem sacrificed.
The biggest difference I see is the 5DSR has deep blacks and shadows where the a7rII has very open shadows. You can see an example of this with he black cars below. I’ve checked the settings for the 5DSR and even with everything turned down, the shadows are still too dark. I much prefer the open shadows that the a7rII produces.
Because the images are saved for the web you lose some of the sharpness—so it’s not the best way to judge the images. When you look at the RAW files the 5DSR is the clear winner based on sharpness. The a7rII is close behind the 5DSR and a step up from the 5D MKIII
If I had to pick one I would go with the 5DSR because everything works or will work with Canon (such as my Profoto Air-TTL). That said, I’m really impressed with the a7rII...it has made me rethink what I need in a camera. For instance, I love the a7rII’s electronic viewfinder. It great for reviewing images in bright sunlight. With the Canon I need to find shade in order to see the screen clearly. One thing I wish the a7rII had is a quick way to change focus on-the-fly. I found a workaround by customizing the buttons, but you still need to hit the center button before the dial lets you move the focus point. With the 5DSR I can just move the dial making it really fast to follow someone with the focus. After using the massive amount of focus points on the a7rII the 5DSR focus feels like a let down. The size of the a7rII makes it great for carrying around. It is less intimidating...allowing you to take more discreet photos.
Sony has impressed me with the a7rII, which now has a permanent home in my camera bag.
Canon 5DS R test
There are tons of very scientific tests of the Canon 5DS R on the web. When I got mine I simply wanted to know who how it compared to my old Canon 5D MKIII and my Phase One IQ180. I don’t need charts or numbers I just wanted to see a real world image. I did a quick very un-scientific test out my studio window.
All three camera’s where photographed very similar to the pulled back photo above. I then overlaid them all at 100% which gives the crops below. I’m only looking at two things with my test, resolution and sharpness. The IQ180 is still king in that regard but I’m very impressed with how well the 5DS R did. I’ve always felt that the 5D MKIII had a lack of sharpness which prevented me from using it for more than people. Maybe it’s the added resolution but the 5DS R has a sharpness that puts it much closer to the IQ180. This is the first time that I might consider using a Canon for studio work.
This is the first time that I might consider using a Canon for studio work.
DIY: Overhead Camera Stand
Studio stands are great but when shooting from above, the legs of the stand will get in the way of the shot. Hence, we created one ourselves. We got two 20ft. aluminum squared pipes, three pieces of plywood, two Avenger plates and two tall boys to...
Studio stands are great but when shooting from above, the legs of the stand will get in the way of the shot. Hence, we created one ourselves. We got two 20ft. aluminum squared pipes, three pieces of plywood, two Avenger plates and two tall boys to create a rolling, adjustable studio stand. We still need to tethered the camera to a computer but unfortunately, the firewire cord is not long enough to reach our tower on the ground. Instead, we tethered to a MacBook Pro up high next to the camera and controlled it using Screen Share with our MacPro from below. It worked great. To top it off, Capture One now has an app for the iPad. It's amazing and works well from shooting to viewing to changing camera settings and more.
iPhone 4 photo closeup
Some folks have been asking for a higher res example of the iPhone 4 cover photo. The sample that I posted here was a screen grab from the Zinio version of the magazine. Zinio adds compression to photos to save on spacenot the best way to judge qu...
Some folks have been asking for a higher res example of the iPhone 4 cover photo. The sample that I posted here was a screen grab from the Zinio version of the magazine. Zinio adds compression to photos to save on spacenot the best way to judge quality of an image, which is certainly of interest in this case.
So here is the full image, followed by closeups of certain details.
Macworld iPhone 4 cover
Ive always thought it would be cool to photograph the cover of Macworld magazine using an iPhone as my camera. When the new iPhone 4 was released with the 5MP camera, the editors at Macworld were excited to see if it could be done. What better way...
Ive always thought it would be cool to photograph the cover of Macworld magazine using an iPhone as my camera. When the new iPhone 4 was released with the 5MP camera, the editors at Macworld were excited to see if it could be done. What better way to showcase the phones new camera than to have an iPhone take the photo of the iPhone on the cover?
Normally when I shoot the cover of Macworld Magazine, I use a Phase One P65+ which is a 60 MP digital camera. It has twelve times the megapixel count of an iPhone 4. This was going to be a very challenging task for the iPhone. My goal was to photograph the cover using only the iPhone and any available app for the iPhone (I couldn't use Photoshop on my Mac!)
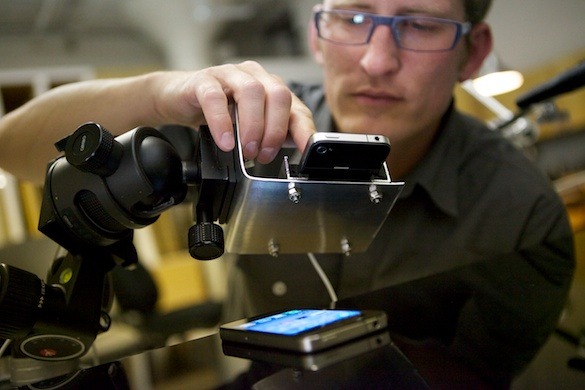
For the most part, my strategy for photographing the cover didn't change from how I normally would photograph with the Phase One digital camera. I still had my normal set with lots of lights, flags and stands. I did have to change my light source from strobes to tungsten lights because the iPhone can't sync with studio strobes. I did end up making my own camera mount for the phone to go on my tripod (monopod). I hadnt seen one that would do exactly what I needed (even if I did I didnt think it would ship to me in time) so I picked up some parts from the hardware store and rigged one myself.
Normally when I photograph the cover I use my Mac to add the iPhone's screen, clean up dust, scratches and any other imperfections. I wasn't going to have that same control on my iPhone so I had to ensure the photo looked good and close as possible to final in-camera. During the shoot I would send the image files over to the art director at his computer so he could drop the image into layout. We needed to be sure the scale and crop was perfect.
The iPhone's Retina display was truly awesome. I was really able to see the detail in the photo as I was shooting. It made me wish Apple produced all their desktop monitors this way. The final photo was dust-free and looked great. I was extremely impressed with the detail that the iPhone was able to capture. For post production I used two iPhone apps: PhotoForge and Resize-Photo. PhotoForge was used to remove a slight green cast from the photo. Resize-Photo was used to increase the photo from 216 dpi to 290 dpi in order to meet printing requirements. One app that I wish had been available when I was photographing the cover was Camera+ 1.2 with separate touch exposure and touch focus.
Also check out the Editor's Desk inside the magazine where Jason writes about me and my process for creating this month's cover or view online here.
The digital version of the magazine is out now on Zinio. The printed version should be on newsstands soon. See what you think:
http://www.zinio.com/browse/publications/index.jsp?productId=6564920
iPhone 4 goes underwater
http://vimeo.com/moogaloop.swf?clip_id=13491167&server=vimeo.com&show_title=1&show_byline=1&show_portrait=1&color=ff9933&fullscreen=1 Recently my vacations have been very water based. I think my kids might be part fish, they never want to leave th...
Recently my vacations have been very water based. I think my kids might be part fish, they never want to leave the water. We were in Lake Tahoe this past weekend. Usually, my camera gear is stranded on the beach as I spend most of my time in the water. I could get high end underwater gear but this is a vacation not work so I wanted something small and fun. Therefore, I ordered an Aquapac 104 Phone/GPS Case from L.L. Bean ($30) for my iPhone. For the most part, the case worked great. My iPhone didn't get wet or damage. The material that the case is made out of gives a slight softness to the photos and videos, which I didn't mind. At the end of the day, you really need to clean the Aquapac case with soap and water to keep it clear.
When I was out of the water I was able to take photos and video without a problem. Once the camera was in the water I couldn't get the iPhone screen to respond to my touch. I'm not sure if this would happen in warmer water like Hawaii. The water in Lake Tahoe is ice cold. In order to take video I started recording before going under water and that worked fine. I used iMovie on the iPhone to edit the movie. It's amazing that the whole thing can be captured and edited right on the iPhone. Above is a quick movie I made with my kids.
You can see the video on Vimeo or Youtube
Weekly photos April #1
Here are some more photos from my "Weekly photos" series.You can read more about the series here. http://www.peterbelanger.com/posts/45-weekly-photos
Here are some more photos from my "Weekly photos" series.You can read more about the series here. http://www.peterbelanger.com/posts/45-weekly-photos
Macworld GPS opener
I'm working on the opening photo for a Macworld article about iPhone GPS software. Unlike last month's red carpet shot, we didn't start with a sketch. This time we discussed in length what they were looking for. The concept is to show an iPhone mo...
I'm working on the opening photo for a Macworld article about iPhone GPS software. Unlike last month's red carpet shot, we didn't start with a sketch. This time we discussed in length what they were looking for. The concept is to show an iPhone mounted on the front windshield of a car. We started by contacting Mercedes-Benz of San Francisco to see if they would let us photograph one of their cars. They were extremely helpful and gracious. The only stipulation was we couldn't drive it or take it off the lotwhich wasn't a problem since we were planning to composite the street view later. We were even lucky enough to have a break in all the rainy weather so we could shoot outside.
To photograph the view out the car window I rented some suction cups and mounted a camera to the hood of my car. We scouted possible locations by previewing the street view in Google Maps. The camera was tethered to my MacBook Pro, which I was manning from the passenger seat. I used the Canon capture utility to adjust exposure remotely and take the photos. Then I used Adobe Bridge to view the images after they were taken.
All the necessary parts have been photographed. The next step will be assembling everything in Photoshop.
Weekly photos Jan #4
Here are some more photos from my "Weekly photos" series. You can read more about the series here. http://www.peterbelanger.com/posts/45-weekly-photos
Here are some more photos from my "Weekly photos" series. You can read more about the series here. http://www.peterbelanger.com/posts/45-weekly-photos
Weekly photos Jan #2
Here are some more photos from my "Weekly photos"series.You can read more about the series here. http://www.peterbelanger.com/posts/45-weekly-photos
Here are some more photos from my "Weekly photos"series.
You can read more about the series here. http://www.peterbelanger.com/posts/45-weekly-photos
Weekly Photos Jan #1
Here are some more photos from my "Weekly photos" series
Here are some more photos from my "Weekly photos" series
Merlin Steadicam test
http://vimeo.com/moogaloop.swf?clip_id=8070404&server=vimeo.com&show_title=1&show_byline=1&show_portrait=1&color=ff9933&fullscreen=1 I've been wanting to try out a Steadicam for my Canon 5D Mark II for awhile now. I wasn't sure which kind to get a...
I've been wanting to try out a Steadicam for my Canon 5D Mark II for awhile now. I wasn't sure which kind to get and the more research I did the more confusing it became. I finally concluded that the Merlin Steadicam was the best fit for what I needed.
I'm a strong believer in renting something before you buy. Everyone that I spoke to said that a Steadicam was something that needed lots of practice and it wasn't something you could rent for the day. I went against my own advice and bought the Merlin Steadicam. When the Steadicam arrived I thought I was going to pull it out of the box and start filming (duh, see above about the warnings regarding practice).
I spent most of the day learning to balance the camera. Setting up the camera was much harder than I thought. Once I got things configured I went out and started filming. My assistant Michael and I tested walking, running, panning, and walking on stairs. Things were looking good, but we wanted to test something that combined all the challenges at once. We found a block-long flight of stairs to test on that would work perfectly. We needed something to track as we were testing, so of course I volunteered to ride my bike down the stairs as Michael filmed.
I was very impressed with how smoothly things looked considering we didn't have much practice. If this had been filmed without the Steadicam the movie would have been extremely jumpy and unwatchable.
The purpose of the movie was really an exercise to see how the Steadicam would perform in a difficult situation with very little training. I was very happy with the results and am excited to see how much better it will look once we REALLY figure things out.
You can also watch the video on youtube.com http://youtu.be/PbiVNb7I65Y
Weekly photos
As much as I'd love to share the behind-the-scenes details of every project, sometimes the clients don't want to be written about. I've started a new series of images taken while working, but not showing sensitive content. Most days I'm in the stu...
As much as I'd love to share the behind-the-scenes details of every project, sometimes the clients don't want to be written about. I've started a new series of images taken while working, but not showing sensitive content. Most days I'm in the studio shooting, and I have the curtains drawn for 10 hours. That really limits the subject matter of the images! It's kind of a fun challenge. I'll post my favorites at the end of each week.
Halloween
Photographing my kids for Halloween is fun, but isn't without challenges. One of the biggest issues is that it is so dark that the camera can't focus. Another challenge is that the kids move so fastrunning from door to doorthat it's hard to get th...
Photographing my kids for Halloween is fun, but isn't without challenges. One of the biggest issues is that it is so dark that the camera can't focus. Another challenge is that the kids move so fastrunning from door to doorthat it's hard to get them in focus! In the past I've used manual focus with a higher aperture which worked okay. I've also used the flash pulse to light up the scene so the camera can focus. This also worked okay, but overall I wasn't that happy with it.
This year I used my Surefire flashlight to light up a scene so the camera could focus and it worked great. What I like about the Surefire flashlight is that the light only stays on while the button on the back is pressed. When I let go of the button the light turns off instantly. This makes it easy and fast to turn the light on just long enough for the camera to focus. It is no surprise that this precision flashlight is what police officers carry.
It was convenient to be able to hold the light just under the lens and point it where I needed focus rather then have it mounted on the camera. Without the flashlight the photo above would have been completely out of focus. And for the record, I chose the photo above as an example simply because no faces are visible. I have more interesting shots, but not with usage permission of all the trick or treaters.
Dry Ice
Recently I had a shoot that called for a dreamy, cloudy effect. I decided to use dry ice rather then a smoke machine because dry ice smoke stays lower to the ground, which would highlight the products better. It sure makes a project interesting wh...
Recently I had a shoot that called for a dreamy, cloudy effect. I decided to use dry ice rather then a smoke machine because dry ice smoke stays lower to the ground, which would highlight the products better. It sure makes a project interesting when you have an uncontrollable, organic element in the photo. At several points most of the floor in my entire studio (not just the set!) was covered with the fogvery surreal.
On the technical side, the dry ice effect doesn't last very long and we had to come up with ways to prolong it. The dry ice becomes especially activated when placed in hot water. At first we used the hot water from the tap and it didn't fog up very high. We found that boiling hot water really made the fog go into overdrive. We rented 3 large coffee carafes and used them to make gallons of boiling hot water. Next time I might even use a 4th carafe. They are power hogs and kept blowing a fuse, so we had to put each one on it's own breaker.
Most of the time we placed the blocks of dry ice in bowls on the floor, which created a really nice, billowing, San Francisco fog look. I found that to give the fog some more shape it helped to pour it out of buckets. The fog looked great but it disappeared fast.
Overall, the dry ice and it's fog doesn't get things wet (hence the name dry ice). But because of the method of keeping it in hot water, sometimes when we poured the smoke from the buckets we also poured a little water on the floor. Luckily the fog covered the floor and the puddles were not visible.
Digital Lens
Now that I'm using the Phase One P65+ I've noticed that my non digital 150 isn't as sharp as it once was. I was using the Schneider APO-Symmar L lens 150/5.6. I've upgraded that to the Schneider APO-Digitar M lens 120/5.6.I did a very quick test o...
Now that I'm using the Phase One P65+ I've noticed that my non digital 150 isn't as sharp as it once was. I was using the Schneider APO-Symmar L lens 150/5.6. I've upgraded that to the Schneider APO-Digitar M lens 120/5.6.
I did a very quick test on a flat surface. The digital lens does much better with sharpens and retaining detail in the highlights. I photographed at f-16 rather than the optimal f-8 or f-11. I wanted to test the lens how I would be using it, which is mostly f-16 - f-22.
Air Conditioning
The air conditioner for the server room was finally installed today. It may not look like much, but it's going to make everyone happy. For those of you that have been in my studio, you know the servers made a lot of noiseI had to keep the door off...
The air conditioner for the server room was finally installed today. It may not look like much, but it's going to make everyone happy. For those of you that have been in my studio, you know the servers made a lot of noiseI had to keep the door off the room because the servers were so hot. Thanks to the air conditioning, the door could be reinstalled. What a difference! Now it is nice and quiet in the studio.
Server room
In the past, when a job was completed, the film was stored in an archival filing cabinet. With digital it's not that easy. Years ago I converted my darkroom into a server room. The room has grown from a simple place to hold hard drives to holding ...
In the past, when a job was completed, the film was stored in an archival filing cabinet. With digital it's not that easy. Years ago I converted my darkroom into a server room. The room has grown from a simple place to hold hard drives to holding servers for FTP, stock sales, web hosting, FileMaker server and photo archiving. As the room grows, so does the heat output. It's now producing so much heat and noise that I need to get an AC unit to cool things down. I have an air conditioning unit on order with a local vender. Hopefully I can get it installed next week.
Location
The art of packing for location. I try and pack everything very efficiently so it all fits inside my minivan. Everything then needs to fit on two carts no wider than a standard office door.Clientsarealwaysamazed at howmuchIcanfit.
The art of packing for location. I try and pack everything very efficiently so it all fits inside my minivan. Everything then needs to fit on two carts no wider than a standard office door.Clientsarealwaysamazed at howmuchIcanfit.