Macworld iPhone 4 cover
Ive always thought it would be cool to photograph the cover of Macworld magazine using an iPhone as my camera. When the new iPhone 4 was released with the 5MP camera, the editors at Macworld were excited to see if it could be done. What better way...
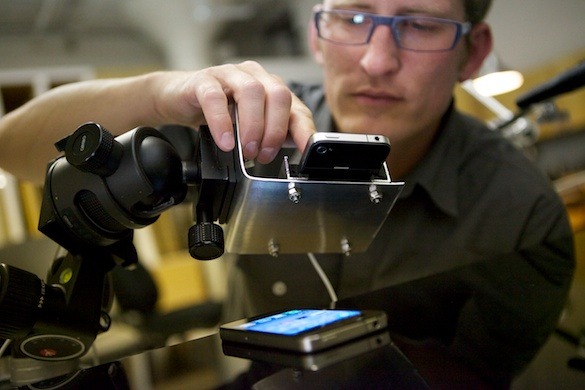
Ive always thought it would be cool to photograph the cover of Macworld magazine using an iPhone as my camera. When the new iPhone 4 was released with the 5MP camera, the editors at Macworld were excited to see if it could be done. What better way to showcase the phones new camera than to have an iPhone take the photo of the iPhone on the cover?
Normally when I shoot the cover of Macworld Magazine, I use a Phase One P65+ which is a 60 MP digital camera. It has twelve times the megapixel count of an iPhone 4. This was going to be a very challenging task for the iPhone. My goal was to photograph the cover using only the iPhone and any available app for the iPhone (I couldn't use Photoshop on my Mac!)
For the most part, my strategy for photographing the cover didn't change from how I normally would photograph with the Phase One digital camera. I still had my normal set with lots of lights, flags and stands. I did have to change my light source from strobes to tungsten lights because the iPhone can't sync with studio strobes. I did end up making my own camera mount for the phone to go on my tripod (monopod). I hadnt seen one that would do exactly what I needed (even if I did I didnt think it would ship to me in time) so I picked up some parts from the hardware store and rigged one myself.
Normally when I photograph the cover I use my Mac to add the iPhone's screen, clean up dust, scratches and any other imperfections. I wasn't going to have that same control on my iPhone so I had to ensure the photo looked good and close as possible to final in-camera. During the shoot I would send the image files over to the art director at his computer so he could drop the image into layout. We needed to be sure the scale and crop was perfect.
The iPhone's Retina display was truly awesome. I was really able to see the detail in the photo as I was shooting. It made me wish Apple produced all their desktop monitors this way. The final photo was dust-free and looked great. I was extremely impressed with the detail that the iPhone was able to capture. For post production I used two iPhone apps: PhotoForge and Resize-Photo. PhotoForge was used to remove a slight green cast from the photo. Resize-Photo was used to increase the photo from 216 dpi to 290 dpi in order to meet printing requirements. One app that I wish had been available when I was photographing the cover was Camera+ 1.2 with separate touch exposure and touch focus.
Also check out the Editor's Desk inside the magazine where Jason writes about me and my process for creating this month's cover or view online here.
The digital version of the magazine is out now on Zinio. The printed version should be on newsstands soon. See what you think:
http://www.zinio.com/browse/publications/index.jsp?productId=6564920
July Macworld behind the scenes
Here are some behind the scenes photos from the July issue of Macworld Magazine. Because of time restraints we used Rob Schultz, the art director at Macworld, as our model. He was photographed in the studio then composited with a photo I took on a...
Here are some behind the scenes photos from the July issue of Macworld Magazine. Because of time restraints we used Rob Schultz, the art director at Macworld, as our model. He was photographed in the studio then composited with a photo I took on a platform of a street car stop in front of my studio.
behind the scenes of "The Darkness"
Here are some behind the scenes photos form the making of my video, "The Darkness." One of my goals with this project was to see if I could make the video without using any of my hot lights or renting any additional equipment. Could a still photog...
Here are some behind the scenes photos form the making of my video, "The Darkness." One of my goals with this project was to see if I could make the video without using any of my hot lights or renting any additional equipment. Could a still photographer rely on "still" lighting equipment and not need to rent "video lights"?
I used the Canon 5D MK II to make the video. All my lighting was created using my Profoto strobes, but using only their modeling lights. Modeling lights aren't made to light complete sets but rather to give you an idea of what the stobe light is going to look like when if fires off. Because of this they are low powered lights, I compensated by shooting at ISO 800.
For the motion I used either the zoom and focus on my lens or a Steadicam Merlin. While I was filming the section with the chrome lamp (with the steadicam) my reflection was very prominent. I had to cover my face and hands with black fabric to minimize my reflection!
Both the opening shot with the two white desk lamps and the closing shot of the group of lamps were captured using stop motion. I used Capture One to shoot tethered with the Canon 5D. The photos were then brought into Aperture to resize and touch up. Dust was really obvious on the black surfaces, yet with Aperture I was able to clean the dust off one photo and then apply it to all the other photossaving my hours of work.
In order to turn the wire lamp so smoothly I used an old VR turn table. It was nice to be able to repurpose equipment I had on hand in the studio. And speaking of repurposingthe long plugs of the hanging lamps originally had lots of kinks in them. A good trick to straighten them out is to use a hot hair dryer. Finally, I used Final Cut Pro to assemble all the stop motion photos and video.
It was a fun process. If you haven't already you can see the video here. http://www.peterbelanger.com/posts/69-video-the-darkness
Macworld iPad cover
The iPad is gracing the cover of the new Macworld magazine. I'm excited about the new cover layout. This is one of the first times that the product hasn't been in the bottom right area of the layout. In fact, the photo is so big that it even cover...
The iPad is gracing the cover of the new Macworld magazine. I'm excited about the new cover layout. This is one of the first times that the product hasn't been in the bottom right area of the layout. In fact, the photo is so big that it even covers the Macworld name. I can only imagine the meetings about that! It seems fitting to have the screen of the iPad represent the cover, seeing how the iPad is going to be such a great device for viewing magazines.
The cover was photographed in 3 parts. First, the hands where photographed while holding an iPadbut with lighting for the hands only. Then I photographed a straight-on view of the iPad with no hands, which enabled me to have more control over the product lighting. Shooting the hands separately also gave me the flexibility to move them around to fit the layout. The third shot was the 3/4 view of the iPad on the table. The gradated background on which the iPad sits was created in post production.
The accompanying article also has some images of the iPad in different environments. We were on a really tight deadline for the project, so I didn't take as many behind-the-scenes photos as I would have liked. The environment photos were taken in my studio with hand model, Stacey Lee. Stacey had jury duty so we had one day to pull everything together and photograph it. At one point we weren't happy with the chair in the photo and we didn't have time to get a new one, so we drove over to my house and quickly grabbed one of my living room chairs.
See my previous post for more photos.http://www.peterbelanger.com/posts/65-weekly-photos-april-1
The digital version is out now via Zinio.com and should be on newsstands shortly.
Weekly photos April #1
Here are some more photos from my "Weekly photos" series.You can read more about the series here. http://www.peterbelanger.com/posts/45-weekly-photos
Here are some more photos from my "Weekly photos" series.You can read more about the series here. http://www.peterbelanger.com/posts/45-weekly-photos
Weekly photos Feb #1
Here are some more photos from my "Weekly photos" series. You can read more about the series here. http://www.peterbelanger.com/posts/45-weekly-photos
Here are some more photos from my "Weekly photos" series. You can read more about the series here. http://www.peterbelanger.com/posts/45-weekly-photos
Macworld GPS opener
I'm working on the opening photo for a Macworld article about iPhone GPS software. Unlike last month's red carpet shot, we didn't start with a sketch. This time we discussed in length what they were looking for. The concept is to show an iPhone mo...
I'm working on the opening photo for a Macworld article about iPhone GPS software. Unlike last month's red carpet shot, we didn't start with a sketch. This time we discussed in length what they were looking for. The concept is to show an iPhone mounted on the front windshield of a car. We started by contacting Mercedes-Benz of San Francisco to see if they would let us photograph one of their cars. They were extremely helpful and gracious. The only stipulation was we couldn't drive it or take it off the lotwhich wasn't a problem since we were planning to composite the street view later. We were even lucky enough to have a break in all the rainy weather so we could shoot outside.
To photograph the view out the car window I rented some suction cups and mounted a camera to the hood of my car. We scouted possible locations by previewing the street view in Google Maps. The camera was tethered to my MacBook Pro, which I was manning from the passenger seat. I used the Canon capture utility to adjust exposure remotely and take the photos. Then I used Adobe Bridge to view the images after they were taken.
All the necessary parts have been photographed. The next step will be assembling everything in Photoshop.
Weekly photos Jan #4
Here are some more photos from my "Weekly photos" series. You can read more about the series here. http://www.peterbelanger.com/posts/45-weekly-photos
Here are some more photos from my "Weekly photos" series. You can read more about the series here. http://www.peterbelanger.com/posts/45-weekly-photos
Weekly Photos Jan #1
Here are some more photos from my "Weekly photos" series
Here are some more photos from my "Weekly photos" series
Dwell planters
I just finished working on a shot for Dwell magazine showcasing modern planters. It was a fun and refreshing set because the "plants" were all made from hand-cut paper by a designer (who turned out to be a fellow RISD alumni). Here are some shots ...
I just finished working on a shot for Dwell magazine showcasing modern planters. It was a fun and refreshing set because the "plants" were all made from hand-cut paper by a designer (who turned out to be a fellow RISD alumni). Here are some shots from behind the scenes:
Macworld: Puttin' it all togehter
I've just completed the opening photo for Macworld's annual Editors Choice Awards. It was a huge puzzle, because I had to take so many different photos and piece them together. The process of assembling the images is the big moment where you find ...
I've just completed the opening photo for Macworld's annual Editors Choice Awards. It was a huge puzzle, because I had to take so many different photos and piece them together. The process of assembling the images is the big moment where you find out if you've envisioned things correctly. As it turns out, just before I took the set of the red carpet down, I decided the photo needed more depth. I took another shot of the red carpet going into the photo rather than straight across the frame. Thankfully, I was able to make this change because when I photographed the people I had them stand to the left, right and center. This gave me the flexibility to move the people around and play with their final positioning.
Recognize that hand holding the award? It's mine. I don't normally use my hands in shots, but because of scheduling it just made things easier.
Rob at Macworld will be adding some words to the awning in the final design phase, but other than that the image is pretty much complete. Keep an eye on news stands for the magazine sometime in mid January.
Here's a link to the sketch that the photo was based on. http://www.peterbelanger.com/posts/46-the-sketch-that-started-it
The sketch that started it
Every year Macworld Magazine has an Editors Choice Awards issue. This year the concept for the article's photo is paparazzi and the red carpet. Below is the sketch that I made while I was on the phone with the art directorI realize the sketch does...
Every year Macworld Magazine has an Editors Choice Awards issue. This year the concept for the article's photo is paparazzi and the red carpet. Below is the sketch that I made while I was on the phone with the art directorI realize the sketch doesn't convey my art school education. Today I photographed various parts that will be compiled for the photo. Here are some photos from the process:
Weekly photos
As much as I'd love to share the behind-the-scenes details of every project, sometimes the clients don't want to be written about. I've started a new series of images taken while working, but not showing sensitive content. Most days I'm in the stu...
As much as I'd love to share the behind-the-scenes details of every project, sometimes the clients don't want to be written about. I've started a new series of images taken while working, but not showing sensitive content. Most days I'm in the studio shooting, and I have the curtains drawn for 10 hours. That really limits the subject matter of the images! It's kind of a fun challenge. I'll post my favorites at the end of each week.
Dry Ice
Recently I had a shoot that called for a dreamy, cloudy effect. I decided to use dry ice rather then a smoke machine because dry ice smoke stays lower to the ground, which would highlight the products better. It sure makes a project interesting wh...
Recently I had a shoot that called for a dreamy, cloudy effect. I decided to use dry ice rather then a smoke machine because dry ice smoke stays lower to the ground, which would highlight the products better. It sure makes a project interesting when you have an uncontrollable, organic element in the photo. At several points most of the floor in my entire studio (not just the set!) was covered with the fogvery surreal.
On the technical side, the dry ice effect doesn't last very long and we had to come up with ways to prolong it. The dry ice becomes especially activated when placed in hot water. At first we used the hot water from the tap and it didn't fog up very high. We found that boiling hot water really made the fog go into overdrive. We rented 3 large coffee carafes and used them to make gallons of boiling hot water. Next time I might even use a 4th carafe. They are power hogs and kept blowing a fuse, so we had to put each one on it's own breaker.
Most of the time we placed the blocks of dry ice in bowls on the floor, which created a really nice, billowing, San Francisco fog look. I found that to give the fog some more shape it helped to pour it out of buckets. The fog looked great but it disappeared fast.
Overall, the dry ice and it's fog doesn't get things wet (hence the name dry ice). But because of the method of keeping it in hot water, sometimes when we poured the smoke from the buckets we also poured a little water on the floor. Luckily the fog covered the floor and the puddles were not visible.
8 ft. Reflector
Here are some photos from a recent editorial photo shoot. I'm always happy when I get to incorporate my Profoto 8 ft. reflector.
Here are some photos from a recent editorial photo shoot. I'm always happy when I get to incorporate my Profoto 8 ft. reflector.
cover creation
After working on the latest cover for MacWorld Magazine I wanted to show what is involved in making a cover. I focused on the three main areas: the photography, photoshop and design. I chose a time lapse format to convey lots of information in a s...
After working on the latest cover for MacWorld Magazine I wanted to show what is involved in making a cover. I focused on the three main areas: the photography, photoshop and design. I chose a time lapse format to convey lots of information in a small amount of time. The only drawback of time lapse is that since half a day goes by in 30 seconds, the whole process seam so easy! Lots of details were left out of the design process (like the cover meetings and rounds of layout options). I began to photograph the design process after the layouts had already been narrowed down to just three cover designs.
On the technical side, for the time lapse video, I used the Canon 5D Mark II with a 24mm-70mm zoom. I chose the 5D because of its great image quality with high ISO's. Canon's sRAW1 gave me the flexibility of a RAW file with the file size of a jpeg. The actual Macworld cover was taken with a Phase One P65+ digital back attached to a 4x5 Sinar X camera with a 65mm lens.
Many thanks to Rob Schultz for allowing me to invade his office and literally shoot over his shoulder.
The music was used with permission by The Brokenmusicbox. You can see more of their music at
After working on the latest cover for Macworld Magazine I wanted to show what is involved in making a cover. I focused on the three main areas: the photography, photoshop and design. I chose a time lapse format to convey lots of information in a small amount of time. The only drawback of time lapse is that since half a day goes by in 30 seconds, the whole process seam so easy! Lots of details were left out of the design process (like the cover meetings and rounds of layout options). I began to photograph the design process after the layouts had already been narrowed down to just three cover designs.
On the technical side, for the time lapse video, I used the Canon 5D Mark II with a 24mm-70mm zoom. I chose the 5D because of its great image quality with high ISO's. Canon's sRAW1 gave me the flexibility of a RAW file with the file size of a jpeg. The actual Macworld cover was taken with a Phase One P65+ digital back attached to a 4x5 Sinar X camera with a 65mm lens.
Many thanks to Rob Schultz for allowing me to invade his office and literally shoot over his shoulder.
The music was used with permission by The Brokenmusicbox. You can see more of their music at http://www.myspace.com/tbmb