Dwell Vacuums
We had an amazing two days with Dwell Magazine. This time, we got creative with vacuums. They all sucked! The process started off by using a rough overlay of the spread from Brendan, the art director. This allowed us to map out where the crumbs an...
We had an amazing two days with Dwell Magazine. This time, we got creative with vacuums. They all sucked!
The process started off by using a rough overlay of the spread from Brendan, the art director. This allowed us to map out where the crumbs and vacuums went without interfering with his final design. The crumbs are strategically placed and the paths of the vacuums were cleared using different size brushes. The next step was to photograph all the vacuums separately at the correct angle, matching the area that was cleared out for them in the crumbs.
Sift through the mess at your local newsstand and sweep up a copy of the October 2010 issue of Dwell Magazine. You can also get a copy at Zinio.com
Dwell - Make It Yours
Here are some behind-the-scenes photos for the current cover of Dwell's "Make It Yours" magazine. It was like a puzzle figuring out how to fit all the pieces together. Good thing we had donuts to keep us focused.
Here are some behind-the-scenes photos for the current cover of Dwell's "Make It Yours" magazine. It was like a puzzle figuring out how to fit all the pieces together. Good thing we had donuts to keep us focused.
More Macworld behind-the-scenes
As you may have noticed, I was really pleased with the September issue of Macworld. Here is one last batch of behind-the-scenes images. I've also included a set of images which I used to compose into one of the shots. To see the final composited p...
As you may have noticed, I was really pleased with the September issue of Macworld. Here is one last batch of behind-the-scenes images. I've also included a set of images which I used to compose into one of the shots. To see the final composited photo check out Macworld magazine on the newsstand or get a digital copy at Zinio.com.
Veins
I'm sharing even more behind-the-scenes images from the September issue of Macworld since people seem to really like seeing what goes into the shots. These images were taken during the shoot for the overhead image of two people playing Scrabble at...
I'm sharing even more behind-the-scenes images from the September issue of Macworld since people seem to really like seeing what goes into the shots. These images were taken during the shoot for the overhead image of two people playing Scrabble at the table.
You'll notice 3 interesting things about this shot: First, is that both people were photographed separately. This was done because the models were only available at different times. Second, you might be wondering why the models are holding their hands up in the air. That is one of the tricks to keep their veins on their hands and arms from showing. The blood flow is greatly reduced when raised above the heart, thereby keeping the hands much smoother. The models need to lift their arms up every couple of photos. The third interesting thing about the shot is that the camera was so high up I had to rely on auto focus! Unfortunately, auto focus doesn't work well with glossy surfaces (like the table or product). I added a paper with lines and numbers drawn on it to help the camera focus. The paper was then easily removed in post production.
For the final composited photo check out Macworld magazine on the newsstand or get a digital copy at Zinio.com.
iPhone 4 photo closeup
Some folks have been asking for a higher res example of the iPhone 4 cover photo. The sample that I posted here was a screen grab from the Zinio version of the magazine. Zinio adds compression to photos to save on spacenot the best way to judge qu...
Some folks have been asking for a higher res example of the iPhone 4 cover photo. The sample that I posted here was a screen grab from the Zinio version of the magazine. Zinio adds compression to photos to save on spacenot the best way to judge quality of an image, which is certainly of interest in this case.
So here is the full image, followed by closeups of certain details.
Macworld "Living with your iPad"
Not only was it exciting to shoot the iPhone 4 with the iPhone for the cover of September's Macworld, but there were cool photo assignments for inside the issue as well. One of the shots is the opening spread for the article "Living with your iPad...
Not only was it exciting to shoot the iPhone 4 with the iPhone for the cover of September's Macworld, but there were cool photo assignments for inside the issue as well.
One of the shots is the opening spread for the article "Living with your iPad". The art director, Rob Schultz, wanted to have a female model at the park using her iPadthat was the simple part. First, we had to find a model and a stylist. We used Cassandra E. from Look who was perfect for the part. We worked with stylist Diane McGauley who was instrumental in finding all the props for the photos. She had a small budget to work with but was able to make it look like she didn't.
Due to time constraints and for total control we decided to photograph in the studio. First, I photographed Cassandra in the studio with lighting that I felt would work for any park situation. I took note of my camera height and lens and set off to find a park to place Cassandra into. Once I found the perfect spot, I photographed it with the camera at the same height I had used for the studio photo so the perspective would match. However, I didn't really like the grass or the lighting in the foreground of the park image, so I decided to find better grass. I found some green, healthy, new grass growing under the freeway (of all places!) and captured that to replace the foreground of the park photo.
Here you can see all the photos I used to put together the final image...along with some behind-the-scene shots. For the final composited photo you'll have to check out Macworld magazine on the newsstand or get a digital copy at Zinio.com. Rob did a great job with the layoutincluding an impressive type treatment that interacts with the grass in the imageworth checking out.
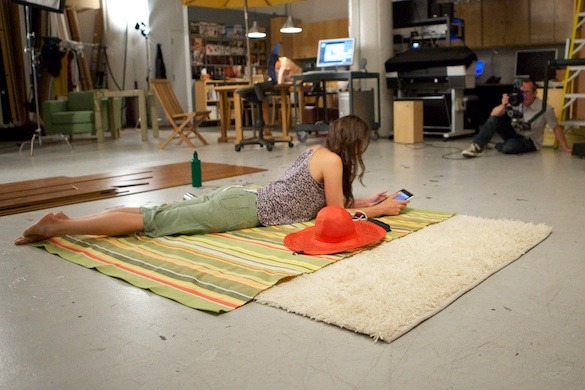
Below are the photos used to make the finalcomposite.
Macworld iPhone 4 cover
Ive always thought it would be cool to photograph the cover of Macworld magazine using an iPhone as my camera. When the new iPhone 4 was released with the 5MP camera, the editors at Macworld were excited to see if it could be done. What better way...
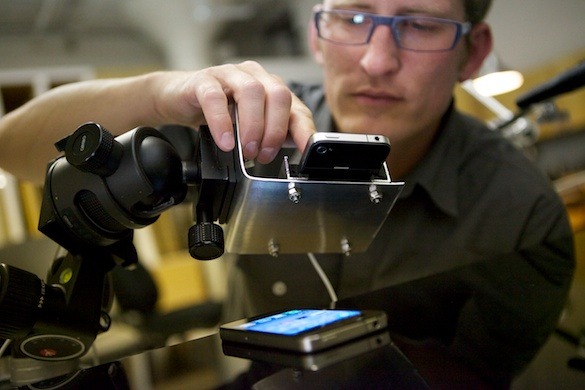
Ive always thought it would be cool to photograph the cover of Macworld magazine using an iPhone as my camera. When the new iPhone 4 was released with the 5MP camera, the editors at Macworld were excited to see if it could be done. What better way to showcase the phones new camera than to have an iPhone take the photo of the iPhone on the cover?
Normally when I shoot the cover of Macworld Magazine, I use a Phase One P65+ which is a 60 MP digital camera. It has twelve times the megapixel count of an iPhone 4. This was going to be a very challenging task for the iPhone. My goal was to photograph the cover using only the iPhone and any available app for the iPhone (I couldn't use Photoshop on my Mac!)
For the most part, my strategy for photographing the cover didn't change from how I normally would photograph with the Phase One digital camera. I still had my normal set with lots of lights, flags and stands. I did have to change my light source from strobes to tungsten lights because the iPhone can't sync with studio strobes. I did end up making my own camera mount for the phone to go on my tripod (monopod). I hadnt seen one that would do exactly what I needed (even if I did I didnt think it would ship to me in time) so I picked up some parts from the hardware store and rigged one myself.
Normally when I photograph the cover I use my Mac to add the iPhone's screen, clean up dust, scratches and any other imperfections. I wasn't going to have that same control on my iPhone so I had to ensure the photo looked good and close as possible to final in-camera. During the shoot I would send the image files over to the art director at his computer so he could drop the image into layout. We needed to be sure the scale and crop was perfect.
The iPhone's Retina display was truly awesome. I was really able to see the detail in the photo as I was shooting. It made me wish Apple produced all their desktop monitors this way. The final photo was dust-free and looked great. I was extremely impressed with the detail that the iPhone was able to capture. For post production I used two iPhone apps: PhotoForge and Resize-Photo. PhotoForge was used to remove a slight green cast from the photo. Resize-Photo was used to increase the photo from 216 dpi to 290 dpi in order to meet printing requirements. One app that I wish had been available when I was photographing the cover was Camera+ 1.2 with separate touch exposure and touch focus.
Also check out the Editor's Desk inside the magazine where Jason writes about me and my process for creating this month's cover or view online here.
The digital version of the magazine is out now on Zinio. The printed version should be on newsstands soon. See what you think:
http://www.zinio.com/browse/publications/index.jsp?productId=6564920
iPhone 4 goes underwater
http://vimeo.com/moogaloop.swf?clip_id=13491167&server=vimeo.com&show_title=1&show_byline=1&show_portrait=1&color=ff9933&fullscreen=1 Recently my vacations have been very water based. I think my kids might be part fish, they never want to leave th...
Recently my vacations have been very water based. I think my kids might be part fish, they never want to leave the water. We were in Lake Tahoe this past weekend. Usually, my camera gear is stranded on the beach as I spend most of my time in the water. I could get high end underwater gear but this is a vacation not work so I wanted something small and fun. Therefore, I ordered an Aquapac 104 Phone/GPS Case from L.L. Bean ($30) for my iPhone. For the most part, the case worked great. My iPhone didn't get wet or damage. The material that the case is made out of gives a slight softness to the photos and videos, which I didn't mind. At the end of the day, you really need to clean the Aquapac case with soap and water to keep it clear.
When I was out of the water I was able to take photos and video without a problem. Once the camera was in the water I couldn't get the iPhone screen to respond to my touch. I'm not sure if this would happen in warmer water like Hawaii. The water in Lake Tahoe is ice cold. In order to take video I started recording before going under water and that worked fine. I used iMovie on the iPhone to edit the movie. It's amazing that the whole thing can be captured and edited right on the iPhone. Above is a quick movie I made with my kids.
You can see the video on Vimeo or Youtube
July Macworld behind the scenes
Here are some behind the scenes photos from the July issue of Macworld Magazine. Because of time restraints we used Rob Schultz, the art director at Macworld, as our model. He was photographed in the studio then composited with a photo I took on a...
Here are some behind the scenes photos from the July issue of Macworld Magazine. Because of time restraints we used Rob Schultz, the art director at Macworld, as our model. He was photographed in the studio then composited with a photo I took on a platform of a street car stop in front of my studio.
behind the scenes of "The Darkness"
Here are some behind the scenes photos form the making of my video, "The Darkness." One of my goals with this project was to see if I could make the video without using any of my hot lights or renting any additional equipment. Could a still photog...
Here are some behind the scenes photos form the making of my video, "The Darkness." One of my goals with this project was to see if I could make the video without using any of my hot lights or renting any additional equipment. Could a still photographer rely on "still" lighting equipment and not need to rent "video lights"?
I used the Canon 5D MK II to make the video. All my lighting was created using my Profoto strobes, but using only their modeling lights. Modeling lights aren't made to light complete sets but rather to give you an idea of what the stobe light is going to look like when if fires off. Because of this they are low powered lights, I compensated by shooting at ISO 800.
For the motion I used either the zoom and focus on my lens or a Steadicam Merlin. While I was filming the section with the chrome lamp (with the steadicam) my reflection was very prominent. I had to cover my face and hands with black fabric to minimize my reflection!
Both the opening shot with the two white desk lamps and the closing shot of the group of lamps were captured using stop motion. I used Capture One to shoot tethered with the Canon 5D. The photos were then brought into Aperture to resize and touch up. Dust was really obvious on the black surfaces, yet with Aperture I was able to clean the dust off one photo and then apply it to all the other photossaving my hours of work.
In order to turn the wire lamp so smoothly I used an old VR turn table. It was nice to be able to repurpose equipment I had on hand in the studio. And speaking of repurposingthe long plugs of the hanging lamps originally had lots of kinks in them. A good trick to straighten them out is to use a hot hair dryer. Finally, I used Final Cut Pro to assemble all the stop motion photos and video.
It was a fun process. If you haven't already you can see the video here. http://www.peterbelanger.com/posts/69-video-the-darkness
Video: The Darkness
http://vimeo.com/moogaloop.swf?clip_id=11413780&server=vimeo.com&show_title=1&show_byline=1&show_portrait=1&color=ff9933&fullscreen=1 I've really enjoyed making videos. My latest one is a study in making movement and interest with stationary objec...
I've really enjoyed making videos. My latest one is a study in making movement and interest with stationary objectsin this case, lamps. It is a classic studio setting, yet I tried to capture the personality of the playful lamp designs.
I'll talk more about how the video was made in a later post. Check back or subscribe to my RSS feed.
I was very excited to get permission from Indianna Hale to use the song, "nowhere to be." You can see more of her amazing music at http://www.myspace.com/indiannahale
You can see the video on Vimeo or youtube.
Macworld iPad cover
The iPad is gracing the cover of the new Macworld magazine. I'm excited about the new cover layout. This is one of the first times that the product hasn't been in the bottom right area of the layout. In fact, the photo is so big that it even cover...
The iPad is gracing the cover of the new Macworld magazine. I'm excited about the new cover layout. This is one of the first times that the product hasn't been in the bottom right area of the layout. In fact, the photo is so big that it even covers the Macworld name. I can only imagine the meetings about that! It seems fitting to have the screen of the iPad represent the cover, seeing how the iPad is going to be such a great device for viewing magazines.
The cover was photographed in 3 parts. First, the hands where photographed while holding an iPadbut with lighting for the hands only. Then I photographed a straight-on view of the iPad with no hands, which enabled me to have more control over the product lighting. Shooting the hands separately also gave me the flexibility to move them around to fit the layout. The third shot was the 3/4 view of the iPad on the table. The gradated background on which the iPad sits was created in post production.
The accompanying article also has some images of the iPad in different environments. We were on a really tight deadline for the project, so I didn't take as many behind-the-scenes photos as I would have liked. The environment photos were taken in my studio with hand model, Stacey Lee. Stacey had jury duty so we had one day to pull everything together and photograph it. At one point we weren't happy with the chair in the photo and we didn't have time to get a new one, so we drove over to my house and quickly grabbed one of my living room chairs.
See my previous post for more photos.http://www.peterbelanger.com/posts/65-weekly-photos-april-1
The digital version is out now via Zinio.com and should be on newsstands shortly.
my studio is a playground
I have fond memories of visiting my parents at work. They may have seen their offices as unexceptional, but I thought they were a wonderland. Their everyday office tools were fantastic objects that held much intrigue for me. So many different type...
I have fond memories of visiting my parents at work. They may have seen their offices as unexceptional, but I thought they were a wonderland. Their everyday office tools were fantastic objects that held much intrigue for me. So many different types of pens, paper, copy machines, snacks, and my favoritethe staple remover.
Now that I'm a dad, my own kids visit me at work. My studio may not be a traditional office, but it is my place of business. What I view as everyday tools, they see as amazing playthings. Wooden apple boxes become large legos, stands become rocket ships, carts are cars, large backdrop tubes are matchbox raceways. They even have a contest to see who can make the postage scale read the highest. Seeing my studio through their eyes is incredibly refreshing and exciting.

Top 10 iPhone Camera Apps
I'm obsessed with camera apps on the iPhone. I love running a photo through different apps and seeing how different they can become. No one camera app works for me. I need several in order to find the one that will work best for that situation. He...
I'm obsessed with camera apps on the iPhone. I love running a photo through different apps and seeing how different they can become. No one camera app works for me. I need several in order to find the one that will work best for that situation. Here's a list of the top ten camera apps that I keep coming back to.
Here's the original unaltered photo from the iPhone.
Hipstamatic I use Hipstamatic all the time, it's my number one camera app. I love the very original images it produces. Great borders, color and contrast....what else can I say, I love it. On the other hand, I do wish I was able to import a photo previously taken.
ShakeitPhoto What makes this camera app great is it's lack of options, point and shoot at it's best. When I need a great looking photo fast I use this app. Another nice thing is that you can shoot an image with the app and it also saves an original version of that image in your library.

TiltShift Generator When I don't want to drag my 4X5 around, I'll use this app to produce a similar selective focus effect. The interface on this app is really well done and a pleasure to use.
lo-mob I love the selection of retro film border in this app. The newest version now lets you turn on borders and effects. This is great when you want to use an photo processed in another program and use a border from lo-mob.
TrueHDR HDR is always fun to play with. TrueHDR does a great job alining the photos and keeping the detail.
PictureShow What makes this app unique is you can add type to your photos. It's like sending someone a postcard. The interface is nice and simple to use. It has standard pretest like Lomo and some unique ones like multi exposures.
SwankoLab This app is made by the creators of Hipstamatic. There are endless possibilities for effects, which is why I'm glad you can import a photo. I take a photo with the iPhone camera app then bring my pick into SwankoLabs for processing. Unlike Hipstamatic I can try out different effects on the same photo until I find one I like.
CameraBag This is another simple and fast camera app. The options are simple, straight forward and render nice results. They also make a desktop app for the Mac which is fun to use.
Pano Panoramic images are awesome and this app is great at stitching everything together. It works best with things at a distance. You can see in the photo below that the car in the foreground didn't stitch together well.
QuadCamera When just one photo won't tell the store I use this app. The downside is even when the capture rate is set to slow, it's still a little too fast for me. I need more time to think about the next photo.
Weekly photos April #1
Here are some more photos from my "Weekly photos" series.You can read more about the series here. http://www.peterbelanger.com/posts/45-weekly-photos
Here are some more photos from my "Weekly photos" series.You can read more about the series here. http://www.peterbelanger.com/posts/45-weekly-photos
Portfolio update and workflow
We just posted a new portfolio update on our website. Since we like to keep the images fresh and update them often, it is important for our sanity to have a well-organized system. Aperture is a key part of our workflow. The portfolio, for both pri...
We just posted a new portfolio update on our website. Since we like to keep the images fresh and update them often, it is important for our sanity to have a well-organized system. Aperture is a key part of our workflow. The portfolio, for both print and web, goes through many changes and iterations. Aperture helps visualize how the photos will be arranged for both the online and printed versions.
The first step is to use the "Light Table" feature in Aperture to organize the photos. Light Table allows you to freely drag, drop, crop and re-arrange photos on a gridded table.
Once the order is finalized, we utilize another feature of Aperture and create a "Book" with these images. Book allows us to customize the print size and number of pages. This book is then named with today's date and becomes our current portfolio live on our website or printed book. As we make edits and additions to the portfolio in the future, we always have the previous versions saved in Aperture which we can reference.
When a printed portfolio is sent to a client the book's name is added to the client's name in our contact database. This allows us to track which portfolios a client has seen. We can also go back in Aperture to view all previous versions of the portfolio as needed. It is an easy way to keep a potentially chaotic situation quite manageable.
Smokin' Pots
The Dwell Smokin' Pots spreadis printed and on newsstands in this month's issue. I'm really happy with how things turned out and as always the dwell team was awesome.You can read about how the photo was created here. You can also read the article ...
The Dwell Smokin' Pots spreadis printed and on newsstands in this month's issue. I'm really happy with how things turned out and as always the dwell team was awesome.You can read about how the photo was created here.
You can also read the article on Dwell's website.
Macworld GPS opener printed
The Macworld GPS photo is printed and on newsstands in this month's issue. You can read about how the photo was created here.
The Macworld GPS photo is printed and on newsstands in this month's issue. You can read about how the photo was created here.
Weekly photos Feb #1
Here are some more photos from my "Weekly photos" series. You can read more about the series here. http://www.peterbelanger.com/posts/45-weekly-photos
Here are some more photos from my "Weekly photos" series. You can read more about the series here. http://www.peterbelanger.com/posts/45-weekly-photos
Macworld GPS opener
I'm working on the opening photo for a Macworld article about iPhone GPS software. Unlike last month's red carpet shot, we didn't start with a sketch. This time we discussed in length what they were looking for. The concept is to show an iPhone mo...
I'm working on the opening photo for a Macworld article about iPhone GPS software. Unlike last month's red carpet shot, we didn't start with a sketch. This time we discussed in length what they were looking for. The concept is to show an iPhone mounted on the front windshield of a car. We started by contacting Mercedes-Benz of San Francisco to see if they would let us photograph one of their cars. They were extremely helpful and gracious. The only stipulation was we couldn't drive it or take it off the lotwhich wasn't a problem since we were planning to composite the street view later. We were even lucky enough to have a break in all the rainy weather so we could shoot outside.
To photograph the view out the car window I rented some suction cups and mounted a camera to the hood of my car. We scouted possible locations by previewing the street view in Google Maps. The camera was tethered to my MacBook Pro, which I was manning from the passenger seat. I used the Canon capture utility to adjust exposure remotely and take the photos. Then I used Adobe Bridge to view the images after they were taken.
All the necessary parts have been photographed. The next step will be assembling everything in Photoshop.